
Print-Friendly PDF | Large-Print PDF
An electronic document typically lives in a computer system, data storage device (e.g. USB drive), or on the internet. Customers and employees can receive these documents via email or text message, or they can visit a website to download the document onto their computers. Electronic documents can be printed into hardcopy format or distributed on a CD-ROM disk, although the latter option is diminishing in popularity. Not to be confused with a website or webpage, examples of electronic documents are letters, schedules, written policies, meeting notes, flyers, informational handouts, newsletters, and instructional manuals.
Electronic documents can ease information-sharing for people with disabilities. For instance, many computer users who are blind can take an accessible electronic document and read it using a screen reading program and/or refreshable braille display. Unfortunately, some electronic documents are created with inaccessible elements. As a result, people with disabilities can request and receive an electronic document, only to find that it does not work with their devices. For example, a college professor emails all of the students a document containing the list of reading assignments. If the professor did not ensure that the document was accessible, some of the students may not be able to read it independently, and so immediately fall behind and become frustrated.
The Americans with Disabilities Act (ADA) is national law that protects the rights of people with disabilities so that they have equal opportunity in employment and equal access to all programs, goods, and services that are offered to the public by state and local government agencies, as well as non-profits and businesses. With regards to how employers, government employees, and businesspeople ensure that their employee- or customer-facing documents are accessible, the ADA does not provide specific guidelines or standards. Therefore, it is always a good idea to ask the person with the disability for their preferences. At the same time, you can adopt the following general suggestions for making electronic documents accessible to people who use computer screen reader programs (or screen readers for short).
Start from scratch
Generally, it’s easier to create an accessible electronic document from a blank slate, rather than revise an older document to make it accessible. HTML, Microsoft Word, and Microsoft PowerPoint are the recommended programs to use because they have many accessible features and their files can be opened in both Windows and Macintosh operating systems. Adobe PDF is also an option, but it is more limited in terms of accessibility. The majority of the suggestions that follow will pertain to Microsoft Word and Microsoft PowerPoint. (For more information about generating documents in HTML, please see our fact sheet titled “Accessible-ize Your Website.”)
Microsoft Word
Word 2007 and higher will give you more accessibility features, including an Accessibility Checker.
Headings
Use headings to enhance the user’s reading efficiency. A heading can be a word or a phrase that labels the content that follows. Headings, especially in lengthier text documents, are very helpful to all users because headings group ideas together and let readers skip to desired content. On a restaurant menu, three headings could be Drinks, Appetizers, and Entrees. In an employee manual, a heading could be Sick Leave or Dress Code. When you add a heading, use Word’s Styles so that the headings are recognized as such by a screen reader. Go to the Styles section of the Word ribbon, and select a Heading option, as pictured below. Select Heading 1 for the main header, Heading 2 for a sub header, and so on. You can change font attributes as you normally would in Word. High contrast color combinations are generally recommended.

Table of contents
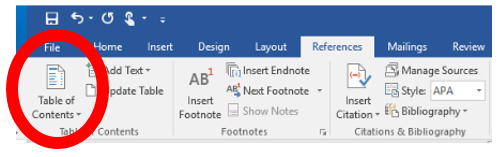
When adding a table of contents, use the Table of Contents builder that is found under References, as pictured below.
Bullets, Lists
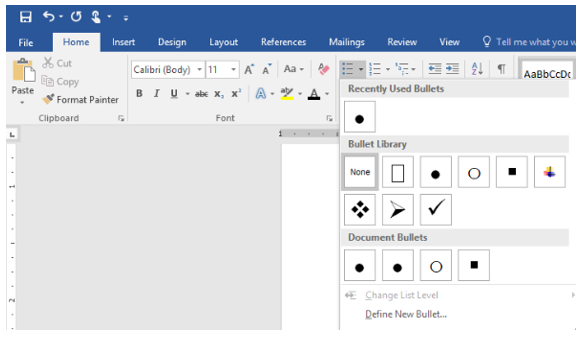
When adding a list of bulleted items, use the bullets given by Word, as pictured below. Otherwise, the screen reader will not announce the items as a list. (Do not type a hyphen in place of a bullet as a screen reader will not read it.)
Headers and footers
Make sure anything that is found in the header or footer of your Word document is also found in the body of the document because a screen reader will likely skip headers and footers. So, for example, if you type contact information into the header or footer, give that information elsewhere in the document, such as on a title or introductory page. Footnotes can be placed in the body of the text as well, such as in a reference section on the back page. Typically, page numbers are not important to screen reader users because they will navigate by heading before navigating by page number.
Tables
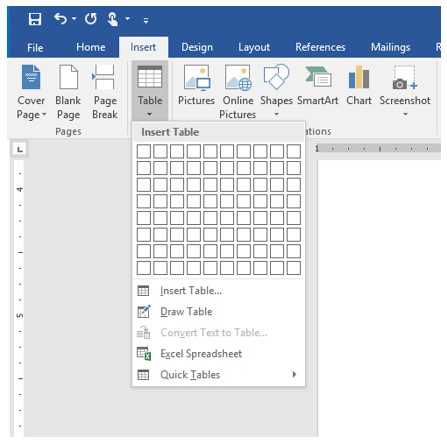
For screen reader users, tables can be more difficult to navigate than a paragraph of text. So add tables only when necessary, and create the tables using Word’s Table design feature under Insert, as pictured below. Make sure that your top row contains the labels for each column. If your table is large and spans more than one page, go to Table Properties and change the two options in the Row tab: uncheck the box next to Allow row to break across page, check the box for Repeat as header row at the top of each page.
Graphs and charts
Grey or greyscale should not be used in charts or graphs because it would be inaccessible to someone with total color blindness. For graphs and charts, use different patterns or place a high contrast label inside the graph segment. Black, white, regulation yellow, federal gold, federal blue, and regulation brown are the best color choices for graphs and charts because these can be differentiated by most people including those with a form of color blindness.
Graphics and photos
Describe important graphics (photos, charts, diagrams, etc.) with Alternative Text (Alt-Text). Without Alt-Text, a screen reader will inform that there is a graphic or image on the document but not describe it. If the graphic is helpful for reading comprehension, then describe it. If the graphic does not particularly meaningful, then a description is not necessary. For example, on a flower shop’s flyer, Alt-Text is not needed for the flower border graphic, but is needed for each photo of the bouquets that are for sale.
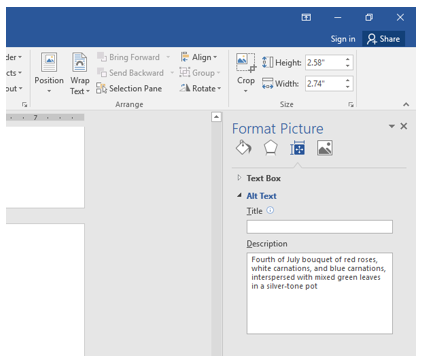
For brief descriptions, use Word’s Format Picture. Start by adding the graphic to the document. Right click on it and go to Format Picture. Go to Layout & Properties, then Alt-Text. Write a short (125 characters or less) description of the graphic in the Description field, as pictured below. Leave out phrases like “image of,” or “picture of” in your description. If you find a long website address or similar code already entered into the Description field, delete it for efficiency’s sake. What is typed here will be invisible on the document but read by the screen reader. If you decide to add a photo caption for the benefit of all readers, it is still a good idea to add a brief Alt-Text as explained above.
For more complex graphics, such as diagrams and charts, the Alt-Text can consist of the brief description (explained above) plus a longer description in the body of the document. The longer description will benefit all readers, including those using a screen reader. If you wish to give an outline of a diagram, you can mention that in the brief description under Format Picture. For example, the brief description could read “Diagram of visual pathway – See outline after image.” (It is socially acceptable to use the word “see” in a description to a person using a screen reader.)
Visit the website for the National Center for Accessible Media to read examples of effective Alt-Text for bar charts, line graphs, pie charts, etc.
Page breaks
Use page breaks. A screen reader can read elements on the electronic document that are usually invisible, such as paragraph breaks that are created by the Enter key. These are read as “blank.” If you want to add a new page to your document, use a page break rather than hitting the Enter key repeatedly.
Hyperlinks
Use precise words for hyperlinks. If you add a hyperlink to your electronic document, edit the hyperlink so that it is displayed on the document as a concise word or phrase rather than a website address or code. For example, a hyperlink to an ADA website about service animals, https://www.ada.gov/regs2010/service_animal_qa.html, can be simplified to service animals. To do this, right-click on the original hyperlink, go to edit hyperlink, type in the word or phrase in the Text to display edit field at the top of the window. Instead of click here for the link’s text to display, use click here for testimonials, click here for pricing info, etc.
Accessibility Checker
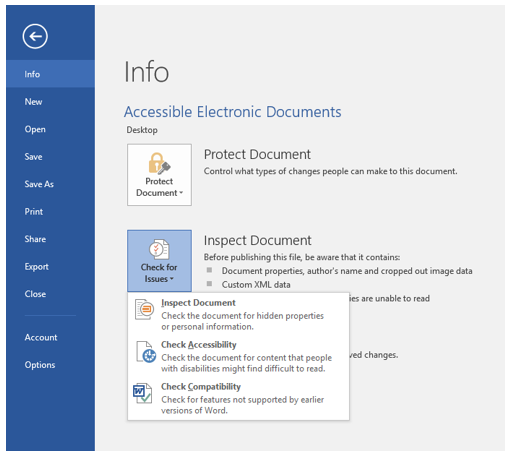
Stated earlier, newer versions of Word offer an accessibility checker, a feature that inspects your document and lists accessibility errors and warnings. While the checker will not catch all potential accessibility issues with your document, it will catch some of the simpler issues mentioned in this fact sheet, including graphics missing alt-text and repeated blank characters. After composing your document, locate the Accessibility Checker in the Review tab; or go to Check Accessibility under the Check for Issues button in the File tab, as pictured below. When you fix each issue, the Accessibility Checker will immediately remove it from its list.
Microsoft Powerpoint
- Follow the guidelines for composing Word documents, given above. This includes how to insert a table, add a bullet, describe graphics and photos, simplify display text for hyperlinks, and use Accessibility Checker.
- Use Office Theme slide templates, pictured below, so that the screen reader follows the intended reading order. In templates, you can customize your background color and font attributes. High contrast color combinations are generally recommended.

- Give every slide a unique title to make it easier for the screen reader user to navigate to a desired slide.
- Use subtitles, closed captioning, and video description when showing a movie. This will make the movie accessible to people with a hearing or visual disability.
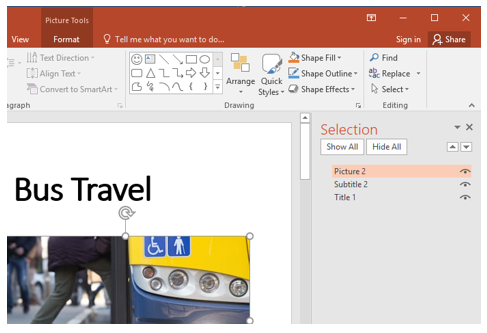
- Check reading order. After you’ve composed slides, ensure that the screen reader will follow the sequence of ideas as you intended with Selection Pane. Go the Home tab, click on Arrange, then Selection Pane. The Selection list, as pictured below, will show you the reading order of the items on your slide, and will give you the option to change the order. You can also hide a specific item on your slide. This is handy if you want an item, like a slide title, to be picked up by the screen reader but invisible to visual readers.
![]() The Northwest ADA Center is a member of the ADA National Network.
The Northwest ADA Center is a member of the ADA National Network.
This fact sheet was developed under grant from the Administration for
Community Living (ACL), NIDILRR grant #90DPAD0002. However, the
contents do not necessarily represent the policy of the ACL, and you
should not assume endorsement by the federal government.